The Synology NAS (Network Attached Storage) drive’s main purpose is to provide fundamental space that can be accessible by every person on a private network. Sometimes even that time comes when you need to access your important file or document and you’re outside your home or office network.
During those times, If you have stored data onto Synology NAS then it makes your work easier to access it with the help of its built-in utility. This utility is called as Synology QuickConnect. It lets you access a genuine and secure connection with your NAS no matter, where you are in the world.
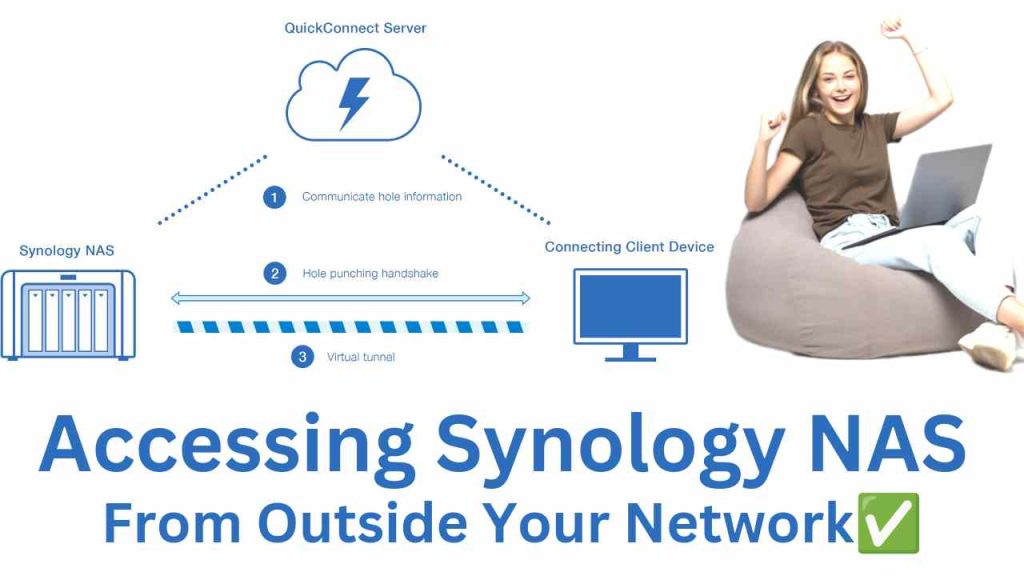
In other words, the QuickConnect allows you to access the Synology NAS remotely. It is a conduit that allows you to access your Synology outside of your office or home remotely from anywhere around the world.
Additionally, it is a very super useful tool and the main advantage of having “Synology Quick Connect” is if you are not on the same network then you can also use it without punching holes in your firewall or without doing any port forwarding. Well, you all need a minimal setup through QuickConnect. So here’s the guide to starting with QuickConnect on the NAS drive.
What is a Synology QuickConnect ID?
Well, the Synology QuickConnect ID allows their client applications to connect to the Synology NAS Diskstation through a secure internet connection. You can also establish the port forwarding rules without any hassle. Moreover, it can seamlessly work with Synology Developed packages to enable the Download Station, Photo Station, Audio Station, Surveillance Station, Video Station, Cloud Station, Note Station, and mobile applications.
How to enable Synology QuickConnect?
- Firstly go to control panel > Synology QuickConnect > General
- Then check to Enable QuickConnect
- After that, type the current information of your Synology account or if you are a new user then register for the new account.
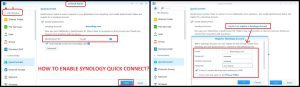
- In the next step, you need to identify the new QuickConnect ID.
- Also, ensure that the password is easy to remember. So that you are able to access the Synology ID anytime, anywhere.
- After making the required operations to Synology settings, click on the apply button.
Where to find Synology QuickConnect NAS DiskStation?
As you already know the Synology QuickConect helps to connect the Diskstation from the internet connection. And to access QuickConnect you need to find it beforehand. Well, three major and simple ways will surely help you to find the QuickConnect ID.
Establishing a QuickConnect ID for the very first time.
Here are the steps when you access the NAS QuickConnect ID for the first time. These steps will help you to connect to Synology.
- Firstly click on the ‘control panel’ of the DSM 5.0 and join the network. Then the tab can be visible to you which says ‘QuickConnect ID.’
- When you are prompted to the Synology website community then simply click on products and then check for the product line as well.
- From there you will get a lot of information about the product under the ‘QuickConnect ID’ option.
- After that, go to the ‘network neighborhood’ section and the tab will be visible to you which says QuickConnectID: xxxx-xxx-xxx-xxx.’
- On the other hand, these details will be presented to you on the network cards, and make sure that they should not be disabled.
- In this way, go to the network DSM into the control panel and right-click to select the network card from the settings.
- Thereafter, you need to register for the NAS on their community website.
- In the next step, you need to secure the QuickConnect ID and make sure that it won’t have access to your account on the portal.
- Lastly, make sure that the NAT device doesn’t cover, if it is, so it won’t be able to reach the internet connection.
How to change the Synology QuickConnect ID for NAS?
If you are accessing the QuickConnect ID then you can conveniently connect over the internet or without worrying about the port forwarding rules and cumbersome network settings. The steps will help you to change the QuickConnect ID in the case of Synology QuickConnect Security.
- First of all, sign into the Synology account and click on my Diskstation manager.
- Therefore, choose the attached device which you want to change with your QuickConnect and then choose the ID. Also, make sure to use the characters in your password such as %3F+[]^$, @!*&$, a-z, 0-9, -, _.
- Now choose a new password for the Synology ID and click on the OK button when it is completed.
- After the login with the new ID and the password, now set the Diskstation that automatically allows you to sign in to the account. For that go to System > Admin > Use > Auto login.
- Now you can access the Synology account via web browser and for that, you need to enter QuickConnect Synology URL https://quickconnectid.synology.com into the address bar and then you will be instructed to set a new password for the device.
- Also, make sure that the default Synology Quickconnect URL has been put into the right place and it should be correct as well.
- Also, you can access the Diskstation at any time if you have a local network connection.
- Set the password and apply the settings when you are done.
Steps to access the Synology remotely via QuickConnect ID
Check out the steps to remotely access the Synology NAS by using QuickConnect. If you have your QuickConnect ID then you can operate from both within and outside of the local network. This high-tech benefit is offered by the OS. In this feature, if you desire then you can also change the name and the port number if required. But first, make sure that you have certain things such as:
- A computer device (make sure that it is connected to the same router as the Synology NAS is connected via wired or wirelessly).
- A Synology NAS drive
- Admin rights to the Diskstation.
These are the things that are required most when you want to access your Synology ID remotely.
- Prominently, go to QuickConnect URL: find.synology.com
- After you enter the Synology Quickconnect address, then click on the login button and your Diskstation user account or admin account. Be sure that it should have Administrative permission.
- When you reach the login page then you need to enter the default credentials which might be the username: admin, password: blank the field.
- At the top of the menu, click on QuickConnect > manage > modify the profile…
- Under the admin name bar, type your new name. Make sure that the name can be recognized easily and understandable for the other when they connect the Synology remotely over QuickConnect ID.
- Be sure that the PC should be listed under the hostname so that the users can approach the network properly.
- Lastly, save the settings, enable HTTP(S) Service, and complete the QuickConnect login process.
- After the login, select the Diskstation settings and follow the on-screen settings.
So these are the methods that will help you to find your QuickConnect Synology.
Steps for the Synology QuickConnect Setup
The Synology NAS QuickConnect must be connected to your web account for work. For that, you need to provide them access to your NAS over the internet connection.
- After the QuickConnect Synology Login as an admin, now head over to the control panel and tap on the Synology account which you might find under the services tab.
- When you are prompted to the next screen, then click on the Synology account link.
- In the pop-up screen, Synology Quickconnect authorization required, fill in the asked credential details if you have or you can also sign up for a new account.
- When it is done then click on the same link to allow the NAS to connect to the logged-in account.
So now you are done with the above steps. From the underneath point, you can set up the QuickConnect in just a couple of minutes.
- On the control panel settings, you will find the option of external access under the connectivity option, click on it.
- On the next page, check the enable QuickConnect box under the QuickConnect tab.
- Afterward, create the QuickConnect ID with a unique admin username and password. Make sure that they should be linked to the NAS account. So it will be easy for you to connect to the NAS account over the local network connection.
- Move forward to the advanced settings and find the button. When you reach then allow the NAS to create the port forwarding and relay on the Quickconnect services.
- Also, you can pick the applications to which you want to get access over the internet.
- Once the Synology settings are done, hit the apply button. Also, it will take a few seconds to reflect which is good to go.
If you wish to disable the settings then you can do so from QuickConnect Synology NAS and simply disable or uncheck the Enable Quickconnect box.
How do I change Synology QuickConnect password?
With the help of the reset option, you can change the password of your Synology QuickConnect ID. Walk through the underneath steps to reset or to change the password of the Quickconnect ID.
- Primarily, you need to locate the reset button with the help of a paper clip.
- Hold the Synology NAS reset button for four seconds until it will emerge a beep sound.
- If you press or hold the reset button continuously then the OS will be restored.
- After the reset, launch the Synology NAS assistant and double click to log into the NAS Synology device.
- By default, the username of the Synology NAS is admin, and the password section you need to leave as it is.
- Once you are logged into the NAS account then you can easily change the admin password.
It is important to know that the admin password is the same as before it was. It couldn’t be changed even after the reset. As it is set as a default. In case, you might forget the admin password of QuickConnect, then you can reset the Synology NAS password
How to access Synology NAS on network without QuickConnect?
In this article, we will provide different ways to access Synology remotely without Quickconnect. But first, you need to have the important components mentioned below.
- You need a Synology NAS with the current DiskStation.
- A working internet connection.
- Use UPnP compatible Router in case of EZ Internet.
These are the things that you require for the Synology network without using Quickconnect.
EZ Internet method
To use the EZ internet method you need to have a UPnP-supported router. To choose the EZ internet connectivity, go to the Diskstation menu and it will begin guiding you through the complete steps.
- Go to the first screen and click next and you will reach the firewall setup.
- Check the box with “Enable firewall to block incoming connections”.
- If you desire to use the Diskstation manager then click on next and place a tick into the service which you want to access.
- You can also scroll by the given list and place a check on those services which you want to access.
- In the next step, you need to set up a hostname by typewriting into the box.
- Moreover, you can also change the domain name by selecting the appropriate hostname.
- On the next screen, you need to complete the registration of your Synology account before you accept the terms and conditions of the Synology.
- Once it is done, click on the “next” button.
- Check the settings before pressing the apply button. Once it is finished, click on the finish button so to access the Synology NAS drive.
Port Forwarding method of Synology NAS Diskstation
Before applying this method, you need to understand the QuickConnect Port Forwarding Rules. To do so, go to the menu of Diskstation and click on the control panel. Then choose the network to make the Synology QuickConnect Secure. Also, make sure the IP address should be your router. If it is not, then you need to manually configure the DNS server of the network. Also, log in to the web interface of the router to access the ports after the configuration.
Well, every router is different from each other, so you need to set it up with the correct ports that need to be open for a particular access. Thereafter, select the external access section and then find the DDNS tab and click on the add button. However, you will see a huge drop in the menu of dynamic DNS providers. Thus, set up an account to access the services from the provider.
Once the service provider has been selected then simply put all the details of the DDNS server and test the connection to make sure that everything is working accurately. When it is done click on the OK button. Finally, you can set up the port forwarding to access the Synology NAS by using remotely over the internet connection.
How to get rid of QuickConnect Notification?
- If you want to disable the notification then go to the control panel > Quickconnect > Advanced.
- After that, choose the services or applications that you want to enable Quickconnect to work effectively.
- Thus, click on the apply button to save the settings.
Why was the Synology QuickConnect ID not found?
- First of all, go to the network center.
- Select the status and make sure that it should be connected to the internet without any hassle.
- Afterward, check that the Quickconnect should be enabled.
- Therefore, go to network center > internet > Quickconnect and DDNS.
- Ensure that the checkbox is ticked to enable Quickconnect.
- It will also help to confirm the service which you want to apply on your settings of your Synology Quickconnect in advance.
Sometimes the Synology log in DSM not through QuickConnect! What to do?
If your Synology NAS drive is unreachable within the local network, try the underneath points to resolve your issue.
- First of all, go to the Synology Service Status to check the status and make sure that it should be operational. In case, the services have gone low maintenance, then you need to resume until it completes its operations.
- After that, ensure that the Synology NAS has been properly ruling out the internet.
- Along with that, you can connect another device to the same cables and network ports to test the tendency of the internet connection.
- Lastly, sign in to your administration account and check if the Synology status is normal. In case, the Synology has been registered in a different country then make sure to register your mobile number into the same country under your Synology admin account.
Why is Synology Quickconnect not working?
Perhaps, you are having trouble with Synology via message or Quickconnect over the internet. But it is showing a “Synology quickconnect network error occurred” while connecting. It is advised to check the network settings so that you can configure the settings of the device smoothly.
- Primarily, you need to test whether the Synology services are still online or not. If not, then temporarily re-enable or enable the remote access at the center. When this problem is solved then make sure the Synology drive is working appropriately. You can also disable the remote access and revert it to its previous stage.
- Besides, you can also re-enable QuickConnect at its Control Panel / External Access / QuickConnect by first disabling them.
- Additionally, you can manually configure the DNS server with 8.8.4.4 and 8.8.8.8. at Control Panel / Network / General.
- If the error continues, you can ask your ISP for the configuration.
By following the steps mentioned above, Synology QuickConnect will start working. But be sure to walk through step-by-step.