If you are trying to access “find.synology.com” to initialize the Synology NAS setup then let us guide you about how to reach the setup page. We will have to start with its Installation first, as only right Installation process will lead us to the setup page. Before we start the process make sure you have working Internet at home.
Moreover, you will need to plug the NAS near your router as we need to connect an ethernet cable from router LAN to NAS. In case you don’t have any free LAN ports on the router than you can connect the NAS with the ethernet switch too. As you plug the NAS into an power outlet you will hear beep from the unit.
For those you don’t know what NAS is; The Synology Network Attached Storage drives are high-capacity storage devices. You can seamlessly connect to your office or home networks and easily manage files whenever required. Also with the help of Quick connect you can access your NAS with just an URL.
So let’s start the process of Synology NAS Setup & Installation. We can set this unit up via “find.synology.com” and “Synology Assistant”. We will learn both the methods here.
Find My Synology NAS Installation
Well, installing a NAS is a lot easier than you think. We have made a quick video guide too, just in case you need any reference. Or you can simply keep on reading and start the setup process.
What we get in the box
- You will receive an AC adapter.
- An Installation Guide
- RJ-45 LAN Cables x2
- Hard drive tray keys
- 2.5-inch hard drive screws
Install the Hard Drives Into the NAS
First and foremost we will need to load up our NAS with Hard drives. For that, read out the below-mentioned steps.
- Firstly, pull out the drive bay from the Synology NAS.
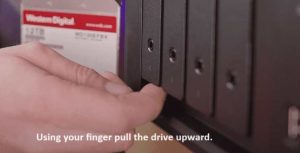
- Then remove the fastening panels from the sides of the drive tray.
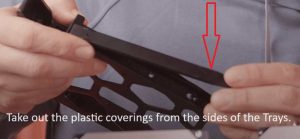
- Afterward, place the drive into the drive tray and then steadily insert the fastening panels to secure the drive in place.
- If you want to use the 2.5-inch hard drives to secure the drives then it will also be a better option.
- After that, insert the drive tray back into the drive bay until you hear a click sound.
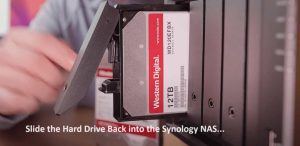
- Once the tray is inserted properly then it’ll produce a sound and that means it is locked into place.
- You can also use the key to lock the trays at place, to prevent pulling out the hard drive accidentally during operation.
This is how to install the Synology NAS Hard drives, and in the next section, you’ll deal with the setup steps of the drive via “Find.Synology.com” and “Synology Assistant”.
Powering On The Synology NAS
For the setup of the Synology NAS device, you need to complete every procedure that also includes connecting it with router. Follow the step given here:
- First, connect the AC adapter to the power port of the NAS.
- Then use the LAN cable to connect the NAS to your switch, router, or hub.
- Also, ensure that the NAS and the PC are connected to the same router network, wired or wireless.
- Now press the power button to turn on the NAS storage device.
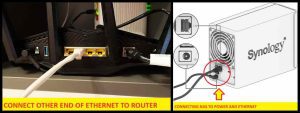
- Wait until it completes its booting process with the modem and router.
- Now open the web browser and type “Find.synology.com” or you can also type the IP of the unit to login into it.
- Or else simply download the “Synology Assistant” to begin the setup.
- Read on further for step by step guide.
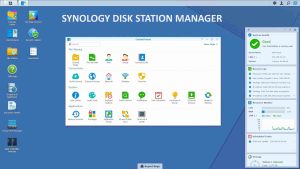
Installing the DSM (Disk Station Manager) On NAS
In this section, you will go through the steps to install the DSM on your Synology NAS by using “Synology Assistant” or “Find.Synology.Com”. But before installing the DSM you need to keep some of the points in your mind. Most people make mistake here and that’s the reason they are not able to find their Synology NAS online.
- Ensure that the Synology NAS has been installed with compatible hard drive.
- Make sure that the NAS Synology power should be turned on, plus Ethernet should be connected between router and the NAS.
- Moreover, ensure that your PC/laptop and the Synology NAS should be connected to the same local network.
These are the points that need to be taken care of while installing the DSM to be able to find your Synology NAS online. In case you miss any then your Synology NAS will not come online. Lastly, in the next segment you will find two options to install the DSM.
Method 1: Installation by using Synology Web Assistant (Find.Synology.Com)
Check out the steps to install the Synology web assistant by using the internet browser.
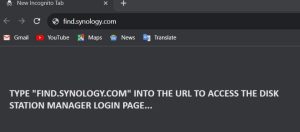
- Initially, you need to open a safe internet browser on your PC or laptop.
- Into the address bar, enter find.synology.com, or you can also type find.synology.com:5000 (used for MAC devices).
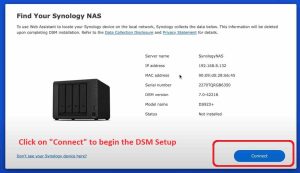
- When the web assistant of the Synology device has been launched then you will simply click on “Connect”. You will get a “Find your Synology NAS” window on your screen. It will show you your Nas’s serial number, IP Address, DSM version, etc.
- In case your browser is not able to find the NAS then try rebooting your all devices.
- Lastly, you need to follow the on screen instructions to complete the setup. This includes creating “Pool and Storage” and taking security measures too.
This is it. The installation of the DSM by using the web assistant is completed now in just a few minutes.
Method 2: Installation with desktop utility by using Synology assistant
Lets learn how using Synology assistant we can install the DSM in just a few minutes.
- Primarily, you need to go to the Synology download center. Select your device and its model number and hit enter.
- After that, click on the desktop utilities.
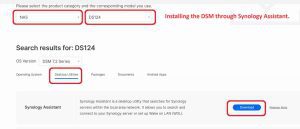
- When you click on the desktop utility then, simply click on the Synology assistant to install or download the Synology assistant desktop utility.
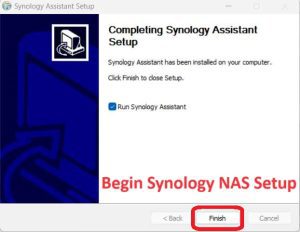
- Afterward, launch the Synology assistant when it is installed completely.
- When you launch the software then it will begin searching for the available Synology devices on the local network.
- Now find out the device and make sure the status should be “ Not Installed.” When you see it, double click on it.
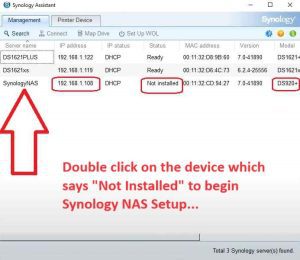
- Therefore, click the check box to read the Synology end user license agreement and confirm the conditions.
- Thus, a web browser will automatically open and the steps will be completed in the web assistant.
- Hence, follow all the on-screen instructions to complete the Synology NAS Setup process
So this is how to install the DSM on your system and you can clearly see that you have two options. You can use any of the method, whichever you find convenient.
Find.synology.com no diskstation found! What can I do?
Well, it becomes one of the common errors for all the users of the Synology device. If you also having trouble connecting the Synology NAS with the new network? Don’t Fret about it, you are in the right place. Try the below mentioned steps and one if these will definitely fix your Synology NAS not found error.
Solution 1: Synology NAS Reboot
Here are the steps to reboot the Synology device.
- First of all, unplug the switch and then turn off the Synology NAS power button.
- After turning off the Synology NAS, then turn off the computer or laptop that you were using for setup purpose.
- After 120 seconds, plug the NAS and computer back in. Now, press the power button steadily on the NAS until it starts producing a beep sound.
- If this doesn’t help then try rebooting your Modem, Router, NAS and Computer too.
Solution 2: Check the Ethernet cable
- First of all, turn ON the Network Attached Storage Device.
- Afterward, you need to wait until the device completes its rebooting procedure.
- Check the ethernet cabel connected between NAS and the router.
- Make sure the cable should be connected on the LAN port of the router.
- Moreover, try connecting any other ethernet cable, in case you are suspicious about that cable being broken or damaged.
Method 3: Try doing Soft/Hard Reset On Synology NAS
- You will need to press the reset button for 4 seconds in order to reset the Synology NAS.
- Now try again accessing the “Find.Synology.com”,
- If this doesn’t work then you can also try resetting the DSM. If you already have data and configurations on DSM then first make a backup. Else if this is the first time setup then go ahead with it.
- For this press the button for 4 seconds then release it, within 10 seconds press the button again for 4 seconds. This time you will hear 3 beeps.
- This shows a successful Synology NAS reset. You can now try the setup again.
Solution 4: Try Using Updated Browser For Synology Web Assistant
In case the Synology web browser doesn’t work then you can try this one. First and foremost try using and updated browser.
- If you are not sure then first update the browser.
- Then you can try switching the browser too. Try using a different browser.
- Secondly, you can also try to use different laptop/computer to access the Synology NAS Login screen.
- Make sure all your devices are connected to the same router.
What should I do my find.synology.com doesn’t work?
It usually doesn’t work when you might be experiencing connection problems while accessing the Synology NAS on your local network connection. So here are the resolutions that you might need to take in such a certain situation.
Resolution 1: Check the power LED indicator status
When the find my Synology does not work then the first thing you need to do is to check the power LED indicator.
- When the power LED indicator is off then it means that your device is off. So you need to boot up the Synology NAS in that situation. If you are unable to boot up the device then there might be an issue with the adapter, power, or any other hardware issues
- When the power LED indicator is flashing it means that the power of the device is sometimes on or sometimes off. To resolve this, you need to wait for an hour before you connect to another device. In case, the power LED keeps flashing then simply unplug the Synology NAS and they retry to connect to it.
- When the power LED indicator is on then it states that the device is powered on. If you are still failing to access the network then there might be any different issues. You can read other troubleshooting resolutions for that.
Resolution 2: Verify the connection with the local network
- Primarily, you need to be sure that the LAN ports’ LED indicators on the Synology device are flashing perfectly.
- Also, make sure that the LED indicator of the router and the modem are flashing properly.
- You can also run the PING command to verify the connectivity between the Synology NAS and your PC.
- After that find the Synology either by using the web assistant or Synology assistant.
- Therefore, you will easily check the “Not Installed”, “Configuration lost/Migratable”, “Ready”, “Connection failed”
If there is any issue you can press the reset button for a few minutes and when it will emerge a beep sound then steadily leave the power button. Thus the Synology NAS has been reset completely. Besides, you can also try these functions when find.synology.com not working on mac.
Where’s my quick connect id for find.synology.com?
Synology QuickConnect is a facility that allows you to easily connect to the Diskstation by using the Synology account from Internet access. For those users who want to remotely access the Diskstation without owning the dynamic DNS or the configuring port then you can use the QuickConnect. So here are the steps to connect to the QuickConnect ID to find my Synology.
- First of all, go to the DSM section and select the ‘control panel’ and click on the ‘Network’ button.
- When you click on the network button then you will see the tab of ‘QuickConnect.’
- Now open the ‘SynoCommunity website’ and click on the products and choose your product line.
- There you will see the information of your Synology model.
- After that, visit ‘Network Neighborhood’ and then you will see the tab ‘QuickConnectID:xxxxxxx-xxxx’ ID.
- Well, the chain of numbers is your Synology NAS ID. In case these details are not mentioned in the network neighborhood then you can check on the network card.
- Also, make sure that the settings of the network card are not disabled in the settings of the control panel.
- Then register the Synology NAS portal and follow the on-screen instructions.
So these are the steps that will help you to find your QuickConnect ID. In case of any help ask the Synology NAS assistance. They’ll be glad to assist you.
Read: Sparklight internet keep disconnecting?